Wednesday, October 26, 2011

Purple Paisley Dinner Party

I. Love. Birthdays. 

Truthfully, I love any holiday {they are all reasons to celebrate!} but birthdays are my favorite.  I like the idea that your birthday is yours and yours alone…It’s ALL ABOUT YOU. 

Now, some of us like being the center of attention more than others, but I don’t know anyone who doesn’t enjoy receiving a little extra love and attention on their birthday.  {I know some who claim not to love it, but deep down…they really do.} 

I always try to make birthdays an extra-special occasion for my friends and family.  I have thrown more surprise parties than I can count, planned endless nights on the town, and even made a special carb-free birthday “cake” for a friend who was going through an Atkin’s phase. {Ok, it was just sugar free jelly shots with candles…but the point is, it was all about HER.}  Of course, I’m no martyr…I throw myself fun birthday parties too!      

This year, I instituted a new tradition that will hopefully continue for years to come.  My close friends and family are invited over for a special dinner during their birthday month.  I love that I can make the people I love feel special by cooking a meal planned specifically for them, and it gives us a great excuse to spend some time together!

Last week, a close family friend was coming over for her birthday dinner.  I knew I wanted the table to have an autumn feel, but I didn’t want it to be all Thanksgiving-y.  Off I went to Michael’s, where there is always inspiration to be found.  Sure enough, a sparkly, purple paisley ribbon caught my eye and I immediately knew what my color scheme would be.  What does this birthday girl love?  Purple AND paisley. Fate in the form of ribbon! 


I thought about what I already had at home, and whether I could complete my table design without spending much more.  We have purple accents in our bedroom, so I knew I could grab a few small candle holders or vases from there.  I have 4 silky purple napkins, 2 different sets of purple placemats, and plenty of gold chargers.  All I needed to complete the centerpiece was some coordinating scrapbook paper to cover my cylinder vase/candle holder!  {One basic $3 glass cylinder gets reinvented for every centerpiece, using just double sided tape and a piece or two of scrapbook paper!}  On the way out the door I passed some purple chargers.  Despite much temptation, I have managed to get by with just round silver chargers and gold square chargers for years, justifying that at least one of them would always coordinate with any given theme.  I finally gave in when I saw these {I got 6} but my total expenses for the table were still under $20! 

To finish it off, I used a brown tablecloth I’ve had forever {stained from many a drop of Thanksgiving gravy, thankfully in easy-to-hide locations}, a gold runner I’d forgotten bout, and those trusty gold square chargers layered underneath the purple ones.  A small square vase turned upside-down served as a sturdy base for a gold platter and purple charger, creating a simple, elevated centerpiece. 

I was really happy with this table, because it captured the birthday girl’s style and I managed to use a lot of things I already had in my home to pull it together!  Try it - you will be surprised by what you can do with what you already have! 

Oh, and the menu?  Three easy harvest-inspired courses.  Just right for a Friday evening, when keeping it simple is a priority!

Happy Birthday, C!


Purple Paisley Dinner Party Menu:
~Toasted walnut, spiced pear and goat cheese salad atop mixed greens, with homemade maple cider vinaigrette
~Homemade pumpkin gnocchi in sage brown butter
~Slow-cooker "baked" apples with maple walnut ice cream


Thursday, October 13, 2011

Pumpkin Cinnamon Roll Pancakes


Last weekend, one of my very best friends came to visit overnight.  We were roommates for several years, and we always have a lot of catching up to do after weeks without seeing each other. It has become tradition for me to make a good Sunday Breakfast while we catch up on girl talk. {J calls this chatter, “yenta-ing it up.”}

These Sunday Yenta-it-Up Breakfasts?  Let’s just say they aren’t typically the healthiest meal of the week.  But really, Greek yogurt with blueberries and a few almonds is SO Monday through Friday.  Plus, I’ve got to make something fairly time-consuming.  More time to chat!

There have been some memorable Sunday breakfasts…Nutella & strawberry crepes, apple walnut French toast, and of course the 3-hour Pumpkin Waffle Fiasco of 2010.  {Fortunately, there was MUCH to talk about that morning.}  But on this beautiful Sunday morning, the Best Breakfast Ever was crowned.  We might as well have been eating dessert, for goodness sake.  Enter the Pumpkin Cinnamon Roll Pancake.  Let me say it again, as it rolls so sweetly off the tongue: Pumpkin Cinnamon Roll Pancake.  


Triple. Threat.

After making myself a quick pumpkin latte, {Please, folks, find $20 in your budget and get yourself an aerolatte.  This little gadget has revolutionized my Sunday mornings.}  I got started on what turned out to be a very simple recipe

To save time at breakfast, you could definitely make the filling and glaze the night before.  The more it thickens, the easier it is to use. {If you do this, refrigerate the glaze, but not the filling.}  You are going to have extra of both...but for the love of sugar, don’t waste it!  I drizzled some of the leftover filling over an apple cake I baked later that day {I added it about 5 minutes before the cake was done.}  I also transferred the filling to a pastry bag with tip and found it MUCH easier to get a nice, neat swirl.  Oh, and you may want to take a bite before adding syrup…chances are you won’t think you need it.

If you cook and bake often and keep a well-stocked pantry, you likely have everything you need to make these already.  {Dinner tonight?}   And, hey…if you like to keep it simple, I won’t tell anyone if you make pancakes using a boxed mix, and just add in the cinnamon filling and glaze.

Enjoy! 


Pumpkin Cinnamon Roll Pancakes

Ingredients
Cinnamon Filling:
½ c butter, melted
¾ c brown sugar
1 Tbs ground cinnamon

Icing:4 Tbs. butter
2 oz. cream cheese
¾ c powdered sugar, sifted
1 tsp vanilla extract

Pancakes:1 ½ c whole milk
1 c canned pumpkin puree
2 large eggs
2 Tbs canola or vegetable oil
2 Tbs apple cider vinegar
2 c all purpose flour
1 Tbs baking powder
½ tsp baking soda
2 Tbs pumpkin pie spice
½ tsp salt
1 Tbs light brown sugar

Directions
Filling: In a small nonstick saucepan, heat butter, brown sugar and cinnamon over low-medium heat until butter is just melted.  {You can do this in the micro if you prefer.}  Whisk ingredients together and pour into a zip-top sandwich bag.  Set the sandwich bag aside, laying down, on the counter.

Icing:
In small nonstick saucepan, {I gave the one used for the filling a quick rinse and used it again} heat butter and cream cheese over low-medium heat until butter is just melted and cream cheese has softened.  Whisk in the powdered sugar and vanilla and combine until smooth.  Set aside.

Pancake Batter:
In a large bowl, whisk together milk, pumpkin, eggs, oil, and vinegar.  In a separate bowl, whisk together all dry ingredients.  Add dry ingredients to the pumpkin mixture and stir until just moistened.

Before cooking the pancakes, check on your cinnamon filling to make sure it has thickened and isn’t too runny.  If it is, make another cup of coffee and sit tight for 15 minutes or so..or try sticking it in the fridge for just a few minutes.  When it’s ready, snip a small corner off the baggie, or transfer to a pastry bag with tip.

Cook the Pancakes: Preheat a large skillet or griddle and Pam it, then reduce heat to medium-low.  Use a ladle to get the batter in the pan and spread it to an even circle.  Squeeze your cinnamon filling to make a swirl on the pancake, just like a cinnamon roll.  When the top of the pancake starts to bubble {about 3-4 minutes} give it a gentle flip.  Cook another 2-3 minutes until the other side is golden.  Flip it onto the plate, cinnamon side up.  If cinnamon filling remains, give the pan a quick wipe with a paper towel {the sugar will burn} then repeat.  Place pancakes on a cookie sheet in the oven, on warm, if you want to keep them toasty til you serve them all at once.  Drizzle with cream cheese icing, serve, and enjoy!  {You WILL enjoy.}

Wednesday, October 5, 2011

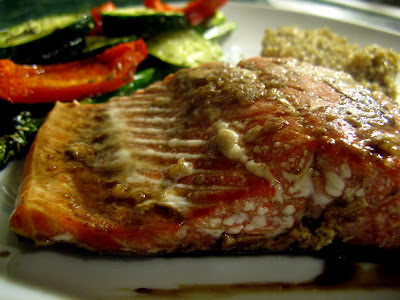
Maple Glazed Salmon


Salmon.  Sure, it's fine...who am I to judge a superfood?  I've never ordered it in a restaurant.  {I will only pay more than it costs to make something myself if I really like it.}  In fact, I’ve never even cooked it. {‘Til now.}  We eat plenty of seafood, but I tend to favor shellfish.  Scallops, shrimp, and even lobster are all regulars on my menu.  And when it comes to fish fish, swordfish and tuna are the ever-trusty standbys. 

Earlier this week, a great sale on wild caught sockeye salmon caught my eye, and immediately I recalled a maple-glazed salmon dish I saw on a menu recently.  The keyword here is maple, folks.  Right now I'm all about irresistible fall flavors, and maple is a close second to my beloved pumpkin.  So I decided to give it a try.


The marinade I threw together was simple – chances are you have all of the ingredients already.  I served it up with some roasted veggies and gingered quinoa for a quick, super-healthy weeknight dish.  Don’t forget! The heart healthiness wouldn't be complete without a glass of red wine!

Salmon, bring your friend Maple and you’ll be welcome on the menu anytime!


Maple Glazed Salmon

Ingredients:
1 lb Salmon
1/3 c maple syrup (I know recipes always call for “Grade B,” but I am cheap. I used store brand maple syrup -lite, no less- and it worked just fine.)
3 Tbs low sodium soy sauce
2 cloves fresh minced garlic
Black pepper to taste
Ground ginger to taste

Directions:
In a small bowl, whisk together syrup, soy sauce, garlic, pepper and ginger.  All of my measurements are approximate, and you may want to alter them to suit your tastes.  Line a baking dish with foil and coat with cooking spray.  Place the salmon, skin side down {if you buy it skin-on} in the baking dish.  Pour marinade evenly over the salmon.  If you have time, cover it and pop it in the fridge for a bit.  When it’s time to cook – heat the oven to 400.  Cook uncovered about 10-12 minutes, flipping once.  You’ll know it’s done when you can easily flake it with a fork.