Wednesday, October 26, 2011

Purple Paisley Dinner Party

I. Love. Birthdays. 

Truthfully, I love any holiday {they are all reasons to celebrate!} but birthdays are my favorite.  I like the idea that your birthday is yours and yours alone…It’s ALL ABOUT YOU. 

Now, some of us like being the center of attention more than others, but I don’t know anyone who doesn’t enjoy receiving a little extra love and attention on their birthday.  {I know some who claim not to love it, but deep down…they really do.} 

I always try to make birthdays an extra-special occasion for my friends and family.  I have thrown more surprise parties than I can count, planned endless nights on the town, and even made a special carb-free birthday “cake” for a friend who was going through an Atkin’s phase. {Ok, it was just sugar free jelly shots with candles…but the point is, it was all about HER.}  Of course, I’m no martyr…I throw myself fun birthday parties too!      

This year, I instituted a new tradition that will hopefully continue for years to come.  My close friends and family are invited over for a special dinner during their birthday month.  I love that I can make the people I love feel special by cooking a meal planned specifically for them, and it gives us a great excuse to spend some time together!

Last week, a close family friend was coming over for her birthday dinner.  I knew I wanted the table to have an autumn feel, but I didn’t want it to be all Thanksgiving-y.  Off I went to Michael’s, where there is always inspiration to be found.  Sure enough, a sparkly, purple paisley ribbon caught my eye and I immediately knew what my color scheme would be.  What does this birthday girl love?  Purple AND paisley. Fate in the form of ribbon! 


I thought about what I already had at home, and whether I could complete my table design without spending much more.  We have purple accents in our bedroom, so I knew I could grab a few small candle holders or vases from there.  I have 4 silky purple napkins, 2 different sets of purple placemats, and plenty of gold chargers.  All I needed to complete the centerpiece was some coordinating scrapbook paper to cover my cylinder vase/candle holder!  {One basic $3 glass cylinder gets reinvented for every centerpiece, using just double sided tape and a piece or two of scrapbook paper!}  On the way out the door I passed some purple chargers.  Despite much temptation, I have managed to get by with just round silver chargers and gold square chargers for years, justifying that at least one of them would always coordinate with any given theme.  I finally gave in when I saw these {I got 6} but my total expenses for the table were still under $20! 

To finish it off, I used a brown tablecloth I’ve had forever {stained from many a drop of Thanksgiving gravy, thankfully in easy-to-hide locations}, a gold runner I’d forgotten bout, and those trusty gold square chargers layered underneath the purple ones.  A small square vase turned upside-down served as a sturdy base for a gold platter and purple charger, creating a simple, elevated centerpiece. 

I was really happy with this table, because it captured the birthday girl’s style and I managed to use a lot of things I already had in my home to pull it together!  Try it - you will be surprised by what you can do with what you already have! 

Oh, and the menu?  Three easy harvest-inspired courses.  Just right for a Friday evening, when keeping it simple is a priority!

Happy Birthday, C!


Purple Paisley Dinner Party Menu:
~Toasted walnut, spiced pear and goat cheese salad atop mixed greens, with homemade maple cider vinaigrette
~Homemade pumpkin gnocchi in sage brown butter
~Slow-cooker "baked" apples with maple walnut ice cream


Thursday, October 13, 2011

Pumpkin Cinnamon Roll Pancakes


Last weekend, one of my very best friends came to visit overnight.  We were roommates for several years, and we always have a lot of catching up to do after weeks without seeing each other. It has become tradition for me to make a good Sunday Breakfast while we catch up on girl talk. {J calls this chatter, “yenta-ing it up.”}

These Sunday Yenta-it-Up Breakfasts?  Let’s just say they aren’t typically the healthiest meal of the week.  But really, Greek yogurt with blueberries and a few almonds is SO Monday through Friday.  Plus, I’ve got to make something fairly time-consuming.  More time to chat!

There have been some memorable Sunday breakfasts…Nutella & strawberry crepes, apple walnut French toast, and of course the 3-hour Pumpkin Waffle Fiasco of 2010.  {Fortunately, there was MUCH to talk about that morning.}  But on this beautiful Sunday morning, the Best Breakfast Ever was crowned.  We might as well have been eating dessert, for goodness sake.  Enter the Pumpkin Cinnamon Roll Pancake.  Let me say it again, as it rolls so sweetly off the tongue: Pumpkin Cinnamon Roll Pancake.  


Triple. Threat.

After making myself a quick pumpkin latte, {Please, folks, find $20 in your budget and get yourself an aerolatte.  This little gadget has revolutionized my Sunday mornings.}  I got started on what turned out to be a very simple recipe

To save time at breakfast, you could definitely make the filling and glaze the night before.  The more it thickens, the easier it is to use. {If you do this, refrigerate the glaze, but not the filling.}  You are going to have extra of both...but for the love of sugar, don’t waste it!  I drizzled some of the leftover filling over an apple cake I baked later that day {I added it about 5 minutes before the cake was done.}  I also transferred the filling to a pastry bag with tip and found it MUCH easier to get a nice, neat swirl.  Oh, and you may want to take a bite before adding syrup…chances are you won’t think you need it.

If you cook and bake often and keep a well-stocked pantry, you likely have everything you need to make these already.  {Dinner tonight?}   And, hey…if you like to keep it simple, I won’t tell anyone if you make pancakes using a boxed mix, and just add in the cinnamon filling and glaze.

Enjoy! 


Pumpkin Cinnamon Roll Pancakes

Ingredients
Cinnamon Filling:
½ c butter, melted
¾ c brown sugar
1 Tbs ground cinnamon

Icing:4 Tbs. butter
2 oz. cream cheese
¾ c powdered sugar, sifted
1 tsp vanilla extract

Pancakes:1 ½ c whole milk
1 c canned pumpkin puree
2 large eggs
2 Tbs canola or vegetable oil
2 Tbs apple cider vinegar
2 c all purpose flour
1 Tbs baking powder
½ tsp baking soda
2 Tbs pumpkin pie spice
½ tsp salt
1 Tbs light brown sugar

Directions
Filling: In a small nonstick saucepan, heat butter, brown sugar and cinnamon over low-medium heat until butter is just melted.  {You can do this in the micro if you prefer.}  Whisk ingredients together and pour into a zip-top sandwich bag.  Set the sandwich bag aside, laying down, on the counter.

Icing:
In small nonstick saucepan, {I gave the one used for the filling a quick rinse and used it again} heat butter and cream cheese over low-medium heat until butter is just melted and cream cheese has softened.  Whisk in the powdered sugar and vanilla and combine until smooth.  Set aside.

Pancake Batter:
In a large bowl, whisk together milk, pumpkin, eggs, oil, and vinegar.  In a separate bowl, whisk together all dry ingredients.  Add dry ingredients to the pumpkin mixture and stir until just moistened.

Before cooking the pancakes, check on your cinnamon filling to make sure it has thickened and isn’t too runny.  If it is, make another cup of coffee and sit tight for 15 minutes or so..or try sticking it in the fridge for just a few minutes.  When it’s ready, snip a small corner off the baggie, or transfer to a pastry bag with tip.

Cook the Pancakes: Preheat a large skillet or griddle and Pam it, then reduce heat to medium-low.  Use a ladle to get the batter in the pan and spread it to an even circle.  Squeeze your cinnamon filling to make a swirl on the pancake, just like a cinnamon roll.  When the top of the pancake starts to bubble {about 3-4 minutes} give it a gentle flip.  Cook another 2-3 minutes until the other side is golden.  Flip it onto the plate, cinnamon side up.  If cinnamon filling remains, give the pan a quick wipe with a paper towel {the sugar will burn} then repeat.  Place pancakes on a cookie sheet in the oven, on warm, if you want to keep them toasty til you serve them all at once.  Drizzle with cream cheese icing, serve, and enjoy!  {You WILL enjoy.}

Wednesday, October 5, 2011

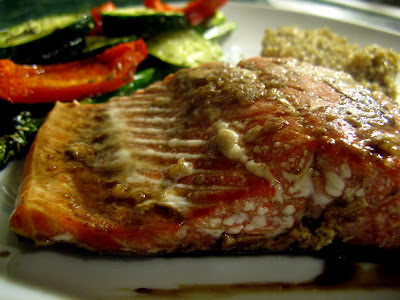
Maple Glazed Salmon


Salmon.  Sure, it's fine...who am I to judge a superfood?  I've never ordered it in a restaurant.  {I will only pay more than it costs to make something myself if I really like it.}  In fact, I’ve never even cooked it. {‘Til now.}  We eat plenty of seafood, but I tend to favor shellfish.  Scallops, shrimp, and even lobster are all regulars on my menu.  And when it comes to fish fish, swordfish and tuna are the ever-trusty standbys. 

Earlier this week, a great sale on wild caught sockeye salmon caught my eye, and immediately I recalled a maple-glazed salmon dish I saw on a menu recently.  The keyword here is maple, folks.  Right now I'm all about irresistible fall flavors, and maple is a close second to my beloved pumpkin.  So I decided to give it a try.


The marinade I threw together was simple – chances are you have all of the ingredients already.  I served it up with some roasted veggies and gingered quinoa for a quick, super-healthy weeknight dish.  Don’t forget! The heart healthiness wouldn't be complete without a glass of red wine!

Salmon, bring your friend Maple and you’ll be welcome on the menu anytime!


Maple Glazed Salmon

Ingredients:
1 lb Salmon
1/3 c maple syrup (I know recipes always call for “Grade B,” but I am cheap. I used store brand maple syrup -lite, no less- and it worked just fine.)
3 Tbs low sodium soy sauce
2 cloves fresh minced garlic
Black pepper to taste
Ground ginger to taste

Directions:
In a small bowl, whisk together syrup, soy sauce, garlic, pepper and ginger.  All of my measurements are approximate, and you may want to alter them to suit your tastes.  Line a baking dish with foil and coat with cooking spray.  Place the salmon, skin side down {if you buy it skin-on} in the baking dish.  Pour marinade evenly over the salmon.  If you have time, cover it and pop it in the fridge for a bit.  When it’s time to cook – heat the oven to 400.  Cook uncovered about 10-12 minutes, flipping once.  You’ll know it’s done when you can easily flake it with a fork.

Monday, September 26, 2011

Pumpkin Chocolate Chip Cookies

It starts with that first pumpkin coffee, on an unexpected crisp morning in September. {You always have to go to Starbucks or Dunkins for it, because Keurig doesn’t have their fall K-cups out quite yet, and lord knows you didn’t save any from last year.}  Then you stock your fridge with pumpkin beer.  Next you find yourself picking up a few pumpkins at the local farm stand.  All of a sudden you’re pulling out your recipe binder to find last year’s pumpkin recipes, and clogging up your Pinterest board with 15 variations of pumpkin muffins.  Just like that, the annual Pumpkin Madness ensues, and will continue until the day after Thanksgiving, when sparkly bulbs and mistletoe abruptly take the place of your farmstand finds.

For me, Pumpkin Madness is the first sign that my favorite season for cooking has commenced.  I abandon my grill, turn on the oven, wipe Hannaford out of canned organic pumpkin {confession: I just can’t be bothered with the labor of using a whole pumpkin} and go to town cooking up pumpkin everything.

This year, I kicked off the fun with an old favorite: pumpkin chocolate chip cookies.  This is a great gateway pumpkin food if you are weary of the gourdtastic goodness.  They’re just like regular chocolate chip cookies, but with a hint of something different.  And the texture? Oh, the texture.  The light, cake-like consistency will have you convinced that’s okay to consume them by the 1/2 dozen. {I won’t judge.}  Put them in the refrigerator? It's a whole new cookie.  

For the full effect, enjoy with a mug of hot cider.  Happy Harvest
!


Pumpkin Chocolate Chip Cookies 
(yields exactly 2 ½ dozen if you eat a cookie or two worth of batter)

Ingredients
1 c canned pumpkin (I never measure this, but use just over ½ of a 15oz can.)
1 c granulated sugar
½ c vegetable oil
1 egg
2 c all purpose flour
2 tsp baking powder
2 tsp ground cinnamon
½ tsp salt
1 tsp baking soda
1 tsp milk
1½ Tbs vanilla extract
1 12oz. bag semisweet chocolate chips

Directions 
In a large bowl, combine pumpkin, sugar, oil and egg.  In a separate bowl, sift together flour, baking powder, cinnamon, and salt.  Dissolve baking soda in the milk and stir in to the flour mixture.  Add flour mixture to pumpkin mixture and  stir by hand until well combined.  Add vanilla and chocolate chips and stir gently. Drop by spoonful on parchment-lined cookie sheet and bake at 350 for about 10 minutes, or until lightly browned.


Sunday, September 18, 2011

Butternut Squash Risotto

As promised, I am sharing the butternut squash risotto recipe that I made for my dinner party last weekend.   I am so glad I discovered this recipe early on in the harvest season.  I suspect I’ll be making it again…maybe even for a Thanksgiving side dish!
 

What I love about risotto is that it always feels like a special dish {perfect for entertaining} but it doesn’t carry the pressure of a difficult dish.   I used to be intimidated by risotto.  “They” say it is a challenge to get it just right, that you can’t step away for a moment, lest you ruin the dish.  True, it does require attention.  The first few times I made risotto, I remained firmly planted in front of the stove throughout the entire process.  But once you have a feel for it, it’s a breeze.  Don’t let the naysayers scare you…they just want you to think it’s difficult so you will be impressed when they make it!  {Actually, “they” might be on to something.} 

There is no shortage of butternut squash risotto recipes out there.  After pouring over dozens of nearly identical recipes, I went with this one from Epicurious.  {Their collection includes recipes from Gourmet and Bon Appetit, and I always seem to find just what I’m looking for.} 

 
Per usual,  I made some changes to the recipe to suit my tastes.  I couldn’t bring myself to add cumin to the dish, especially since I knew I had at least one guest who didn’t care for spicy foods.  Instead, I added some freshly ground ginger. {I use it every chance I get.}  The recipe also called for the addition of roughly chopped spinach or arugula just before serving.  While the greens would have added nice flavor, I just wasn’t willing to sacrifice that creaminess.  Finally, and perhaps most important…go ahead and peel all of the squash.  Trying to remove the skin after roasting is a needless hassle.  I kept some crescent shapes with skin-on, as the original recipe suggested, and the shape was long gone by the time I got the skin off, so they ended up mixed in with the rest anyway.  It’s hard to pass up New England’s farm-fresh squash for a mere $.99/lb. this time of year, but if you really want to keep it simple take my mother’s advice {that I ignored}: buy it pre-peeled and cubed. 
 

Go ahead…pour yourself a glass of wine, put on some good music, hang out in front of your stove for 45 minutes, and get your risotto on.  You won’t be sorry!


Ingredients {4-6 main courses}
3lb butternut squash
6 c nonfat chicken broth (give or take)
1 medium onion, finely chopped
1 Tbs unsalted butter
1½ cups Arborio rice
1 tsp minced garlic
1 Tbs fresh ground ginger
5 or 6 Tbs finely grated Parmigiano-reggiano
1 tsp salt
1½ tsp chopped fresh sage (plus more for garnish

Directions
Roast squash:
Preheat oven to 450°F. Halve squash lengthwise and seed, then cut into 1” cubes and season with salt.  Roast in a shallow baking pan in middle of oven until tender and golden, about 50 minutes. Tent pan with foil to keep warm after removing from oven.

Start risotto after squash has been roasting 40 minutes:
In a medium saucepan, bring broth to a simmer and keep at a bare simmer, covered. Meanwhile, cook onion in butter in a 4-quart heavy pot over moderate heat, stirring, until softened, about 6 minutes. Add rice, garlic, and ginger and cook, stirring, 3 minutes. Stir in 1/2 cup simmering broth and cook at a strong simmer, stirring frequently, until broth is absorbed. Continue simmering and adding broth 1/2 cup at a time {just use a ladle – close enough} , stirring constantly and letting each addition be absorbed before adding the next, until rice is creamy-looking but still al dente {it should be the consistency of thick soup}, about 18 minutes total. {There will likely be leftover broth.} Stir in squash pieces, then stir in cheese, salt and sage and simmer, stirring, 1 minute. {If necessary, thin risotto with some leftover broth.} Serve risotto immediately, garnished with fresh sage.

Tuesday, September 13, 2011

Dinner Party

There are few things I enjoy as much as throwing a dinner party.  Sure, big bashes have their time and place {I’m looking at you, holiday extravaganzas!} but when my guest numbers start to climb above 30, I find it challenging {and expensive!} to prepare the quality of food I’d like.  I have visions of a chef-quality kitchen with 6 or 8 burners, 2 ovens, and an endless island of counter space dancing in my head.  But, until that dream comes true, it’s working with what I’ve got and hoping that I can get hors d’oeuvres from the kitchen to the table before the guys at the party have plucked half of them off the tray.  {Not as easy as it sounds…trust me.}

But, dinner parties?  Whole different scenario.  My sweet spot for a dinner party is six.  The table fits six {and even then I’ve got to hope for two kind, skinny guests who won’t mind being wedged in a bit}, many recipes yield six servings {or can easily be 1-and-a-halved to get there}, and I seem to have about six each of most of my favorite little serving dishes.  But most of all, I can take my time and cook GOOD food {or at least attempt to} when I only have six of us to serve.  {If you have ever been to one of my dinner parties, you know that I mean it when I say, “take my time.”  I am working on that.}


Last weekend I hosted a dinner party honoring two dear friends.  They were married a few weeks ago and I wasn’t able to be there, so this was my little way to celebrate them with a few other friends in the same circle.  J was out of town and it was the first time I’d truly entertained without him or one of my old roomies there to take a coat or pour a glass of wine while I kept an eye on the kitchen.  But, with only five good friends to worry about, there wasn’t much to worry about at all.

One of the other reasons I love dinner parties is because I get to cook for a different audience.  J and I will eat just about anything, but we are certainly the exception to the rule.  I really enjoy taking various guests’ allergies, dislikes and dietary restrictions into account and creating a menu that will please all and maybe even get everyone {myself included} to taste something a little different.  In this case, one guest of honor was a vegetarian.  I’ve never prepared a vegetarian main course in my life.  But, immediately I knew I’d be focusing on mushrooms…until I realized the other guest of honor dislikes mushrooms and onions.  Throw in a dislike of seafood {go ahead, be horrified} and an aversion to raisins and this? Was a challenge.  I love a challenge!  


I figured a pasta dish would be the way to go to ensure that we carnivores felt like we were having something substantial.  At first I considered some variety of homemade ravioli, but I ultimately decided on butternut squash risotto.  It was fantastic, if I do say so myself. {And I do.}  The seasons are just starting to change, and it was a nice fall-inspired dish for a chilly night.  Risotto is a little tricky to keep an eye on while you try to enjoy your earlier courses with your guests, but it all works out.  {Note to self: dream kitchen will also have open layout so I can see my guests at the dining room table whilst stirring my risotto at the 6-burner stovetop.  I hate missing even a moment of good dinner conversation.}

The rest of the menu was less challenging to keep vegetarian, and I was happy to find ways to work in a shout out to the groom {a connoisseur of the chicken finger} and also work in some nuts for extra protein.  There wasn’t much of a theme, which is unusual for me, but I kind of enjoyed the summer flavors and fall flavors coming together…it felt just right for early September.


Here is the full menu.  Butternut Squash Risotto recipe to follow soon!  

~Antipasto Skewers
~Gorgonzola & Fig Crostini with Honey Drizzle
~Baked “Chicken Toes” and Artichokes with Homemade Buttermilk Ranch Sauce
~Spinach, Strawberry & Avocado Salad with Walnuts, Drizzled with Meyer Lemon Oil and  Blackberry Balsamic
~Butternut Squash Risotto
~3-layer Chocolate Cake with Ganache Frosting and Raspberry Coulis


Wednesday, September 7, 2011

Chocolate Crack


Over Labor Day weekend, I committed a series of highly uncharacteristic behaviors.  1- I decided to have an impromptu get-together with only about 24 hours notice. {The uncharacteristic word here would be: impromptu.}  2- I encouraged guests to bring dishes to share and kept the things I made to a minimum.  {Typically, I would still go ahead and make enough food to render the guests’ contributions excessive.}  3- This is the kicker.  The things I did make?  They were EASY.  Just 2 simple desserts {Chocolate Crack and Nutella Cookies} and my go-to No-Bake Nacho Dip that I’ve been making since my early 20’s {when it was often consumed by four or five of us girls after four or five cocktails.}  That’s it.  Throwing a party has never been so simple!  I actually sat on the couch, had a glass of lemonade and WAITED for guests to arrive.   

Not that I’ve been converted.  I’ve been thinking about the menu for an upcoming dinner party for weeks.  {More on that next week.} 

So, before my brief simplicity phase passes, I have to tell you about Chocolate Crack.  Yes, that's what I said. Chocolate Crack.   The friend who gave me this recipe actually called them “New Hampshire Breakway Cookies,” which is all polite and family-friendly...but really doesn't convey the urgency with which you will consume these delicious little sweet & salty treats.  Go ahead and make this recipe, and decide for yourself what to call it. 


Chocolate Crack

Ingredients:
Saltine crackers {the original ones, people – this is not the time to watch your sodium intake!}
1/2 cup brown sugar
1/3 cup butter
12oz bag semi sweet chocolate chips {approx.}
1/4 cup chopped walnuts {approx.}

Directions:
Pre heat oven to 350.  Line a cookie sheet with foil and Pam it. In a small nonstick sauce pan, bring sugar and butter to a boil over med-high high, stirring occasionally. Reduce heat and continue to boil for 3 minutes – do not stir. Immediately spread mixture evenly over crackers and bake for 5-7 minutes. {A rubber spatula works well for the spreading.}  Remove from oven and sprinkle chocolate chips liberally. {I used the better part of the bag.} Pop it back in the over for about 30-60 seconds to soften the chips. Remove from the oven and spread the now-melting chips evenly.  Sprinkle chopped walnuts to taste and set sheet aside to cool.

Once cooled, break into pieces and enjoy. {Patience is not a virtue.  Go ahead and place the cookie sheet in the refrigerator to speed up the process.}  If you manage not to eat it all in one sitting, store what’s left in an air tight container.  


Friday, September 2, 2011

Strawberry Margarita Cupcakes

Everyone loves a beachy cocktail. Even in the dead of winter, sipping on a frozen, fruity drink will transport you to your the Caribbean, where you are relaxing by turquoise waters, warm sun on your cheeks, toes in the white sand, just waiting for your handsome cabana boy to come by and adjust your lounge chair. No? Just me? The point is, when I started to see recipes for margarita cupcakes popping up in various blogs and magazines, I knew I had to try them. Luckily, I had a housewarming party coming up, and the hostess loves margaritas. Excuse, found!

I spent nearly as long searching for the right recipe as I did actually making the cupcakes. Some didn’t call for any liquor {?!} and there were many that called for boxed cake mix with a few clever additions. When I do something, I like to do it right. That translates to no virgin cocktails {even in the cupcake form} and no short cuts.

When I came across The Baker Chick’s Strawberry Margarita Cupcakes post, knew I’d found The One. I loved the recipe, so I really didn’t do much to alter it.

I was short on time, so I decided to pipe in the filling instead of going through the painstaking process of cutting each cupcake. {If you’ve never done this, simply fill a pastry bag with the filling and using a long tip, insert the tip into the center of the cupcake, give it a squeeze, and voila! Cupcake filled.} Unfortunately, my smallest tip was too narrow, and the strawberry seeds kept clogging it up. When I switched to a tip with a wider opening, the filling poured out. {It is quite fluid…but the cupcake absorbs it quickly.} Plan C: I made a few small holes in the top of each cupcake with a straw, and used a teeny-tiny appetizer spoon to get a little filling into each one of them. It was enough to get a little flavor in there, but when I make these again I will take the time to cut the tops OR strain the filling to remove the strawberry seeds so I can pipe it. I saved my leftover filling…it wouldn’t take much to turn it into a delicious cocktail!

To get the full effect, you've got to dress these up like real margaritas! I found some small candy fruit slices {which I cut in half}, added little cocktail umbrellas, and cut some drink stirrers in half to make “straws.”

Cheers!


Strawberry Margarita Cupcakes
{makes 24 cupcakes}

Cupcakes:
3 cups all-purpose flour, sifted
1 tbsp. baking powder
½ tsp. salt
1 cup unsalted butter, at room temperature
2 cups sugar
4 large eggs

3 limes, zested and juiced
½ tsp. vanilla extract
1 cup buttermilk

Strawberry Tequila Puree:
8 oz strawberries, hulled & sliced
1 lime, zested and juiced
1/2 cup of tequila
2 tablespoons of sugar

Frosting:
1 cup shortening
1 cup butter, slightly chilled
4 cups powdered sugar
1/3 cup strawberry tequila puree

DIRECTIONS:
Cupcakes: Preheat the oven to 325˚ F. Line two cupcake pans with paper liners. In a medium bowl, combine the flour, baking powder and salt; whisk to blend. Using a mixer, cream together the butter and sugar on medium-high speed until light and fluffy, about 3-5 minutes. Blend in the eggs one at a time, mixing well after each addition and scraping down the sides of the bowl as needed. Beat in the lime zest, lime juice and vanilla. With the mixer on low speed, mix in the dry ingredients in three additions alternating with the buttermilk, beginning and ending with the dry ingredients. Beat each addition just until incorporated. Divide the batter between the prepared cupcake liners, filling each about ¾ full. Bake 20-24 minutes, or until a toothpick inserted in the center comes out clean. Let cool in the pan 5-10 minutes, then transfer to a wire rack to cool completely

Filling:
While the cupcakes are baking, add your strawberries, lime juice, tequila and sugar to the bowl of a food processor. Puree the mixture until there are no chunks of strawberry. Set aside.

Filling the cupcakes:
Using a small paring knife, cut a cone out of the top of each cupcake. Remove the cut-out cake and spoon a tablespoon of strawberry puree into each cupcake. Replace the top part of the cone, cutting the tip to leave room for the filling.

Frosting: In a large mixing bowl, cream together the shortening and butter on high until well mixed and fluffy. Add the powdered sugar one cup at a time, alternating with a tablespoon at a time of the Strawberry puree. Mix until the frosting is thick and creamy. Spread or pipe onto cupcakes.